
Setting Up Ubuntu 16.04 with NVIDIA GPU: A Detailed Guide for You
Embarking on the journey to set up Ubuntu 16.04 with an NVIDIA GPU can be both exciting and challenging. This guide is tailored specifically for you, ensuring that you have a comprehensive understanding of the process. Let’s dive right in.
Understanding Your NVIDIA GPU
Your NVIDIA GPU is a powerful component that can significantly enhance your Ubuntu 16.04 experience. Before we proceed, it’s essential to know the specifics of your GPU. Check the model and version to ensure compatibility with the drivers we’ll be installing.

| GPU Model | Driver Version |
|---|---|
| GeForce GTX 1060 | 410.78 |
| Quadro K2200 | 410.78 |
Once you have this information, you can proceed to the next step.
Updating Your System
Before installing the NVIDIA drivers, it’s crucial to ensure that your Ubuntu 16.04 system is up-to-date. This will help prevent any potential conflicts and ensure a smooth installation process.
sudo apt updatesudo apt upgrade
These commands will update your package lists and upgrade your installed packages to their latest versions.
Installing NVIDIA Drivers
Now that your system is up-to-date, it’s time to install the NVIDIA drivers. There are two methods to do this: using the official NVIDIA drivers or the open-source Nouveau drivers. We’ll explore both methods.
Method 1: Installing Official NVIDIA Drivers
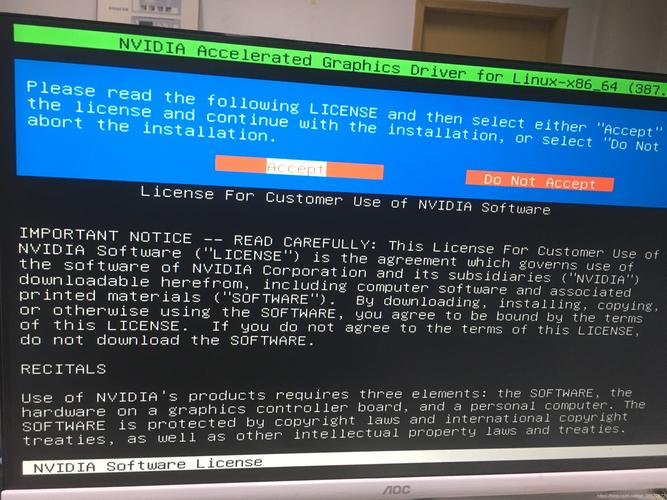
This method involves downloading and installing the official NVIDIA drivers from the NVIDIA website. Here’s how to do it:
- Go to the NVIDIA driver download page and select your GPU model and Ubuntu version.
- Download the appropriate driver package for your GPU.
- Open a terminal and navigate to the directory where the downloaded package is located.
- Install the driver using the following command:
sudo sh ./NVIDIA-Linux-x86_64-410.78.run
Follow the on-screen instructions to complete the installation.
Method 2: Installing Nouveau Drivers
The Nouveau drivers are open-source drivers that provide basic functionality for NVIDIA GPUs. Here’s how to install them:
- Open a terminal and run the following command to install the Nouveau drivers:
sudo apt install nvidia-vgpu
This command will install the Nouveau drivers and enable basic GPU functionality.
Verifying the Installation
After installing the drivers, it’s essential to verify that they are working correctly. You can do this by running the following command in a terminal:
nvidia-smi
This command will display information about your GPU, including the driver version and memory usage. If the command runs successfully, your NVIDIA drivers are installed and functioning correctly.
Optimizing Your NVIDIA GPU
Now that you have the NVIDIA drivers installed, you can optimize your GPU for better performance. Here are a few tips:
- Adjust Power Settings: You can adjust the power settings of your GPU to optimize performance. Open the NVIDIA X Server Settings and navigate to the “Power Management” tab.
- Update Your GPU Drivers: Keep your GPU drivers up-to-date to ensure the best performance and compatibility with new games and applications.
- Use Optimized Applications: Some applications and games offer optimized settings for NVIDIA GPUs. Check the settings of your favorite applications to ensure they are optimized for your GPU.
By following these tips, you can ensure that your NVIDIA GPU is performing at its best.
Conclusion
Setting up Ubuntu 16.04 with an NVIDIA GPU can be a rewarding experience. By following this detailed guide, you should now have a fully functional NVIDIA GPU on your Ubuntu system. Enjoy the enhanced performance and enjoy your favorite games and applications.